Showing posts with label gift. Show all posts

Thursday, 11 September 2014

5 ways to spice up a letter


Now that it costs 62p to send a letter first class in the UK, I can understand why people are less inclined to write to one another. I have friends who don't understand why I still love sending and getting mail the old fashioned way. But a letter on the mat from a friend makes such a change from the brown envelopes containing bills. I have a few pen pals as well as people who share my love of snail mail. With that in mind, here are some ways to spice up a hand written letter.

1. Cool stationary


Letter sets make all the difference! I get most of mine at Artbox, but places like Paperchase and most quirky gift shops stock cute themed envelopes and writing paper.

2. Stickers and tape


Use these to brighten up envelopes and letters.

3. Origami!


Peace cranes are a symbol of... well, peace, and can be flattened into an envelope, making them an ideal little addition to a card or letter.

4. Postcards


I buy postcards when I am out and about, or pick up cool free ones. Put one or two into a letter for your friend to stick up on their wall.

5. Zines


My penpal and I make and swap zines. For those who don't know, zines are simply handmade little books, made to be cheaply reproduced via photocopier. They can be about anything under the sun - poetry, photography, feminism, your novelty pen collection, stories, anecdotes... Find them on Etsy or wemakezines, or make your own to give your penpal something to read on the bus.

Any more ideas for spicing up a letter? Leave a comment or get in touch :)

Tuesday, 2 September 2014

Upcycled paper - Make your own scrapbook


Make your own little book containing lots of different types of paper in this easy project.


You will need:

  • Scraps of paper (old maps, pages from old books, lined or squared paper, tracing paper, magazine pages)
  • Long-armed stapler
  • Card for outside cover


  • Once you have your pages all arranged, fold them in half and attach them using a long-armed stapler. I used a plain piece of card for the outside cover which I then decorated using a paper-cut style decoration, but you could also use stamps, stickers or pens to customise it, or personalise it for the intended recipient if it is a gift. :)


    Write, draw, or stick stuff in it. It's up to you!

    Tuesday, 18 February 2014

    Origami boxes


    I had an origami session one night at a youth club, and I was surprised at how popular it was with the teens, they couldn't stop making them once they knew how! But on reflection it's easy to see why this craft is so popular with all ages.


    As you can see I ended up with simply loads of them. Put sweets in them, or little gifts such as earrings. If you are planning a crafty wedding, they would look great as favours on the tables for guests. Also if you make two boxes with slightly different sizes of paper, then hey presto! A box with a lid!


    Step 1: Fold your origami sheet in half to make a triangle. Unfold and do the same the other way. Unfold your sheet to reveal creases as shown.


    Step 2: Fold each corner into the middle, until you have all four corners meeting like so.


    Step 3: Now take your square, and fold the opposite flat edges into the middle. Rotate and do this for the other set of edges until your square has shrunk as shown. This is just to make the creases necessary for the next step.


    Step 4: Now fold your sheet back out until it looks like the top picture of Step 4 above. The dotted line shows the creases we are now focusing on. Fold these creases in, and as you do so, the sheet should rise up to fold neatly and make your first two corners. It's a little difficult to explain but your box should start to take shape, with the inside starting to resemble an open envelope.


    Step 5: Now we're going to 'close the envelope' - that is, fold the top triangular edge down, pressing it into the bottom of the box. You need to fold the flap just where my thumb is in the picture on Step 4.


    Your box should be finished! Not only is this is cheap quick and non-messy craft for kids, but also an addictive activity for adults, and useful for making parties or occasions even more special, when filled with little treats or knick-knacks. 

    Sunday, 3 March 2013

    Birthday party in a Bento Box


    Remember when I got all excited about bento boxes? This is my first attempt. Not very healthy but I love how cute the little treats look all next to each other in the box.

    The nesting boxes are for sale in Paperchase at the moment, you get four in total so you can play around with different sizes. This bento box is meant for a friend's birthday, so I included a teeny birthday cake, a little bird's nest, a chocolate covered strawberry and some marzipan treats.


    The marzipan sweets were made simply by adding food colouring to separate lumps of marzipan, then rolling out four equal sized sauages and pushing them together to form a long block, which you then cut into cubes with a sharp knife. You can roll them in a bit of icing sugar to stop them sweating, then I used chocolate writing icing to draw little kawaii faces.


    I got a Bento recipe book recently so I'll definitely be making up some more bento boxes. I can't wait to try some healthier recipes and making up some fun lunches for work. :-)

    Monday, 25 February 2013

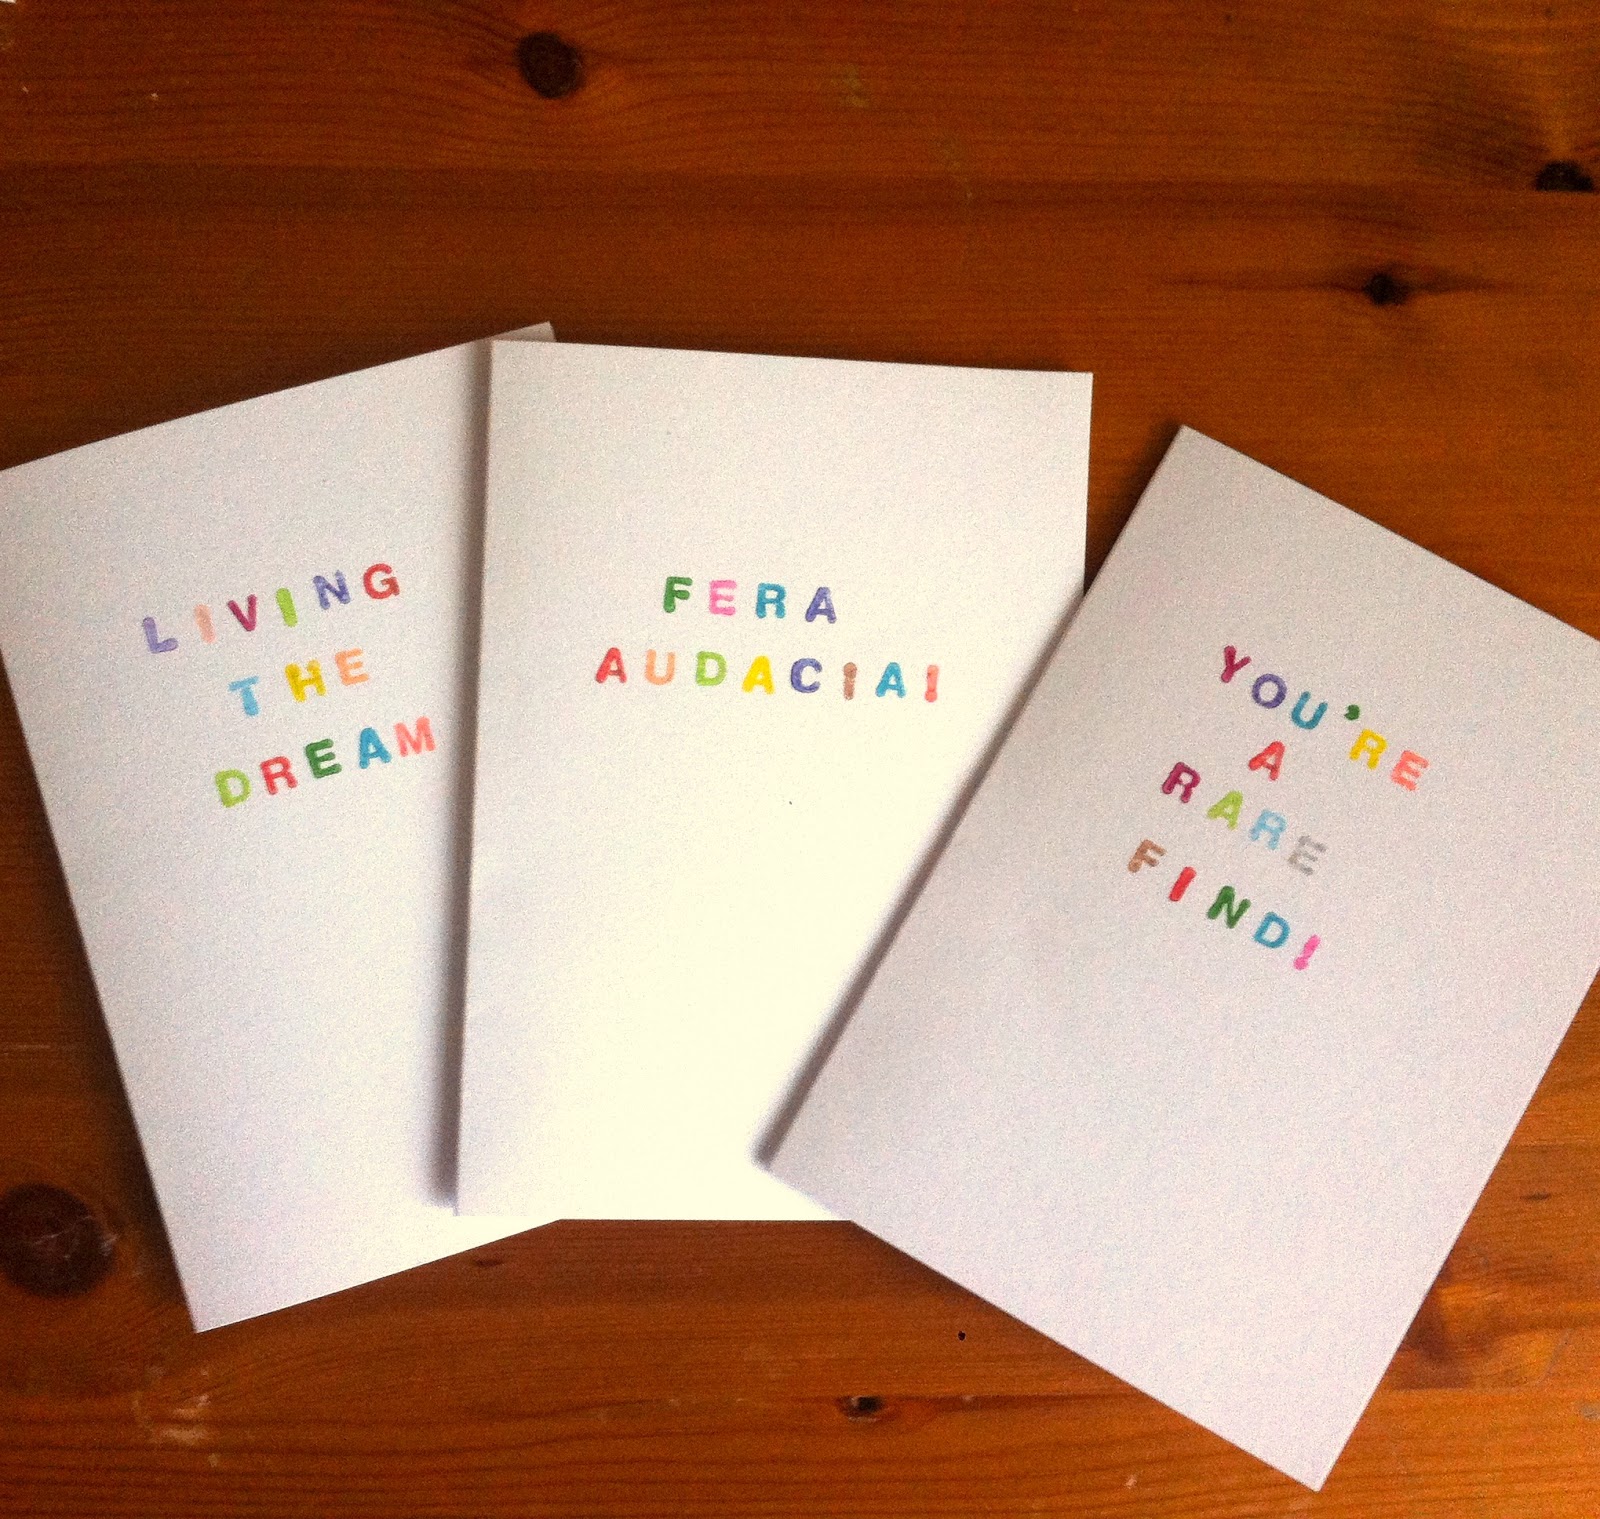
    Greetings cards in a hurry - rubber alphabet stamps


    I often find myself putting together greetings cards in a rush (Sorry, friends and loved ones). The following post shows an idea for a personal greetings card that is laughably simple and requires little to no artistic flair whatsoever - if you're intimidated by drawing or printmaking then this is for you. The end result is quirky, witty and really simple, but in so many cases the simplest ideas can be the most striking and effective.


    Materials:

    Rubber alphabet stamps (mine are from Muji)
    Ink pad (Hobbycraft)
    Blank cards
    Baby wipes/damp tissue


    The little extra something comes in the form of a multi coloured ink pad - I got this one at Hobbycraft. When I saw it I was immediately tempted by it, as I can never really be bothered with lots of different coloured pads, a bit too faffy for my liking. This is perfect and there is a nice little range of colours. The alphabet stamps were a present from friends several years back, but you can see they came from Muji and are still available in their shops now.


    TIP - buy a pair of cheap baby wipes and have one to hand to blot each stamp after you use it. This stops your colours from getting messed up. I got mine in Wilkinsons for under £1. Bless you Wilkinsons, saviour to cheapskate crafters everywhere!

    The real beauty in this method of card making is that the creativity and genius lies not in the technique, but the words you choose to put on the card. As well as the obvious 'Happy Birthday' etc, you can put someone's favourite quote from a film, a joke, a poem, a personalised greeting... the list goes on. All the cards you see here are completely personal to the people receiving them. These are cards for three special girlfriends who made my recent stay in London fantastic from start to finish. They're already through the postal system by the time this blog post goes out, so the surprise hasn't been ruined. ;-)

    I really like the personal touch, the splash of colour and the classy minimalism of these cards. The materials are easy to get hold of, will last for ages and can be used in so many different ways. This is also ideal for a craft group of any age. I think blokes would like this style of card too, what do you think?


    Monday, 28 January 2013

    Upcycled chocolate tins


    Two chocolate tins were kicking around the office after Christmas, and I whisked them home to have a go at transforming them into pretty cake tins. I wanted to let loose with a spray can and these seemed like the perfect first project.


    The paint came from Wilkinsons, and cost about £3 per can. After each tin, I still have just under half a can left, so it was quite cheap.
    Interestingly, the Heroes tin (blue) took the paint really well, but the Quality Street tin was another matter, with the paint struggling to stick. Three coats later though, and I was pleased with the effect. The spraying took up a day, with about three or four coats applied.


    I faced the usual fun stuff when using aerosols – horrible fumes, motes of dust and tiny hairs deciding to stick to the wet paint, etc. I also had to be patient between coats, something I am terrible at. But at the end of day one, each tin was coated nicely. Success.

    The Quality Street tin had an embossed lid that I didn’t really want people to see, so I came up with the idea of giving it a padded fabric panel on top. I cut out a couple of pieces of octagonal cardboard and stuck them together to make a sturdy base, then simply stretched a piece of scrap fabric over some wadding and stapled it all secure. Loads of strong glue and a heap of heavy books on top overnight secured it nicely. When it was dry, I ran the glue round the edge and glittered it up to hide where it meets the tin.


    Next came the risky part – I bought potted paint and decided to try hand-painting the tins. I didn’t want the tins to finish up looking too polished, or mass produced, and a hand painted look would give the tins the folk-art look I wanted. But sometimes something can look great in your head and turn out, well, rubbish. But I bit the bullet and went ahead.


    It paid off! The potted paints don’t smell or give off nasty fumes like the spray cans. They mix beautifully and the consistency is perfect, I had no problems with dripping or anything like that. The closest thing I can compare it to is using acrylic paint, though obviously this is a more permanent medium, and with a smoother finish. They’re also water based, so no need for horrible paint thinners to clean your brushes. It goes on like a dream and you can go into fine detail no problem. It also dries fast. Cue shouts of hooray from impatient people everywhere. 


    I painted the green tin’s fairly basic patterns first, and it went so well I was emboldened to try something more complicated for the blue tin. I wanted something that was illustrator-y and slightly unconventional, so I came up with a portrait illustration for the lid, and little cake illustrations for the sides.

    So, at the end, I’d probably give this revamp job 7 out of ten. I’m pleased with the end result, and the paints are really good. I learnt some lessons for next time - I’d probably mask off the top of the tins where the lid goes, as I suspect repeated use will wear the paint away there. The fabric cover on the green looks alright, but now I don’t think I’d use this tin for food storage as washing up would be tricky. But overall it’s been fun and I loved painting the little pictures and patterns. If other people have tried similar projects I’d love to hear your feedback.


    Sunday, 20 January 2013

    A going-away gift


    I first made a going-away package for my friend Imogen when she went traveling a few years back. This year my childhood friend Charlotte is moving abroad to start a new job, so I’ve put one together for her. Below is a guide to making your own for anyone you know going off an adventure.

    Firstly, you’ll need an empty box of some kind. Personally I think a shoebox or similar is a bit too big, as the whole idea is the gifts are compact. Part of the fun lies in finding small gifts to include, and the recipient probably won’t have a lot of room to pack a large collection of presents. The box I’ve used is an empty Ferrero Rocher box (mmmm), it’s an ideal size, and I like the aesthetic of the gifts behind the transparent plastic.

    Now the fun bit: tracking down some cute little presents to include. Charlotte loves making a house into a home, so I’ve included some little homey bits for her new apartment: little fridge magnets, a photo frame, a teabag holder. Think about the personal situation of the friend, to help you find appropriate gifts. Where are they going? Is it for pleasure, a new job, a new relationship? Are they likely to be homesick? What will they be doing? An example: if your friend is hiking, you could get some new shoelaces, a little compass, or an energy bar.


    Aim for a mixture of useful gifts and some frivolous humourous ones. I’ve used labels to make the gifts a bit more special and raise a smile (Suki’s Box of Labels). The Eric Carle strawberry badge is an in-joke: we used to have a giant strawberry cushion in our old flat. The linen heart was a great find, now Charlotte can have a little piece of the UK hanging up on her wall.


    To encourage her to keep in touch (and because she loves stationary and will be working in an office) I’ve packed up this cute letter set, and some sticky notes and stickers. These are great because they are lightweight and pretty, perfect for Charlotte to stow in her case. All these came from Artbox.


    I just love the look of all the little presents nestled in the box!

    I rubber stamped a large sticker for the top of the box and finished it off with pink ribbon. This is a really unique way to send your friend away smiling. To turn the concept on its head, this could also be a great goodbye gift for a friend or relative if YOU are going away – a Don’t Forget Me box, perhaps!


    Finished!

    Some other ideas for traveling/farewell gifts: 
    • Small pieces of jewellery
    • Keyring
    • Handwarmers/socks/cute tissues
    • Non-perishable food: energy bar, sweets/candy
    • Little notebook/pen
    • Small toiletry items: chapstick, hand cream, toothpaste etc.
    • A photograph of a favourite local haunt, pet or friends
     Have a go!